Homemade Herb Salt: The Perfect Cost-Efficient DIY Gift for Foodies
In a world increasingly appreciative of artisanal touches and thoughtful gestures, the allure of homemade gifts has never been stronger. Among the most cherished culinary DIYs, crafting your own herb salt stands out as a true gem. It's a simple yet profoundly impactful way to elevate everyday cooking, preserve the vibrant essence of fresh herbs, and create a truly unique present. If you've ever wondered how to make herb salt that rivals gourmet store-bought options, you're in for a delightful journey. This guide will walk you through the process, transforming common kitchen staples into a personalized flavor powerhouse.Why Homemade Herb Salt is a Culinary Game Changer
Homemade herb salt isn't just a trend; it's a testament to the idea that simplicity can yield extraordinary results. Here’s why this humble blend deserves a spot in every kitchen and on every gift list:- Unleash a Flavor Bomb: Imagine sprinkling a fragrant blend of rosemary and sea salt over roasted potatoes, tossing it with pasta, or using it as a rub for chicken. Flavored salts instantly infuse dishes with depth and complexity, transforming ordinary meals into gourmet experiences. The aging process often enhances these flavors, making your homemade batches even more robust over time.
- Preserve Nature's Bounty: For gardeners, or anyone with an abundance of fresh herbs nearing their peak, herb salt offers an ingenious way to extend their life. As cooler weather arrives and fresh herbs inevitably fade, turning them into salt ensures their essence endures, allowing you to savor summer's flavors long into winter.
- The Ultimate Cost-Efficient Gift: Store-bought gourmet salts can come with a hefty price tag. By contrast, making your own is incredibly economical, especially if you have access to fresh herbs. This makes it a fantastic option for holiday gifts, hostess presents, or wedding favors, offering a personalized touch without breaking the bank. It truly is the perfect DIY gift for foodies, showing care and culinary insight.
- Endless Versatility: While rosemary salt is a popular starting point, the world of herb salt is vast. You can experiment with sage, thyme, oregano, parsley, dill, or even unexpected additions like dried chili flakes, minced garlic, paprika, curry powder, or a hint of vanilla for sweet-savory applications. This adaptability means you can create a unique blend for every taste and dish.
Understanding Your Options: Three Core Methods for Herb Salt
Before we delve into the step-by-step instructions for how to make herb salt, it's helpful to understand the three primary methods you can employ, each offering distinct advantages in terms of preparation time and shelf life. The method you choose will largely depend on whether you're working with fresh or dried herbs, and how long you intend to store your finished product.- Fresh Herbs for Short-Term Use (Refrigerated): This is the quickest and most straightforward method. You simply blend fresh herbs with salt and store the mixture in the refrigerator. It's ideal for immediate enjoyment or for gifting to be used within a few weeks. The high moisture content from the fresh herbs means it requires refrigeration and has the shortest shelf life, typically 2-4 weeks.
- Fresh Herbs + Drying (Oven or Air-Dry): To significantly extend the shelf life of herb salt made with fresh herbs, drying is essential. After blending, the salt mixture is spread out and dried, either in a low-temperature oven or by air-drying at room temperature. This process removes all moisture, preventing mold and allowing for pantry storage for several months. This is often the preferred method for making gifts.
- Dried Herbs (Home-Dried or Store-Bought): The simplest method for maximum longevity, using already dried herbs (either from your garden or purchased) eliminates the need for any additional drying steps. You simply blend the dried herbs with salt, and it's ready for immediate use and long-term pantry storage. This method offers the most convenience and the longest shelf life, often up to a year.
How to Make Herb Salt: A Step-by-Step Guide
Regardless of the method you choose, the basic principles of how to make herb salt remain consistent. Here's a comprehensive guide to crafting your own flavorful blends:1. Gather Your Ingredients
- Salt: Opt for a good quality coarse salt like sea salt or Kosher salt. The coarser grain provides excellent texture and allows the herb flavors to meld beautifully. Avoid iodized table salt, as it can impart a slightly metallic taste.
- Fresh Herbs: Rosemary, sage, thyme, oregano, dill, or parsley are excellent choices. For rosemary salt, about 1 part fresh rosemary to 4-5 parts salt is a good starting ratio.
- Optional Additions: Consider minced fresh garlic (if drying the salt), dried chili flakes, lemon zest, black peppercorns, or other ground spices like smoked paprika or cumin for unique twists.
2. Prepare Your Herbs
If using fresh herbs, this step is crucial for both flavor and shelf life:
- Wash and Thoroughly Dry: Gently wash your fresh herbs under cool water. Then, lay them on a clean kitchen towel and pat them *completely* dry. Any residual moisture can lead to clumping or, worse, mold if not dried out later.
- Separate Leaves from Stems: Carefully strip the leaves from the woody stems. Stems can impart a bitter flavor to your salt, so discard or compost them.
- If using dried herbs, you can skip this preparation step entirely.
3. The Blending Process (Choose Your Texture)
This is where the magic happens. You'll need a food processor, spice grinder, or even a mortar and pestle for this step.
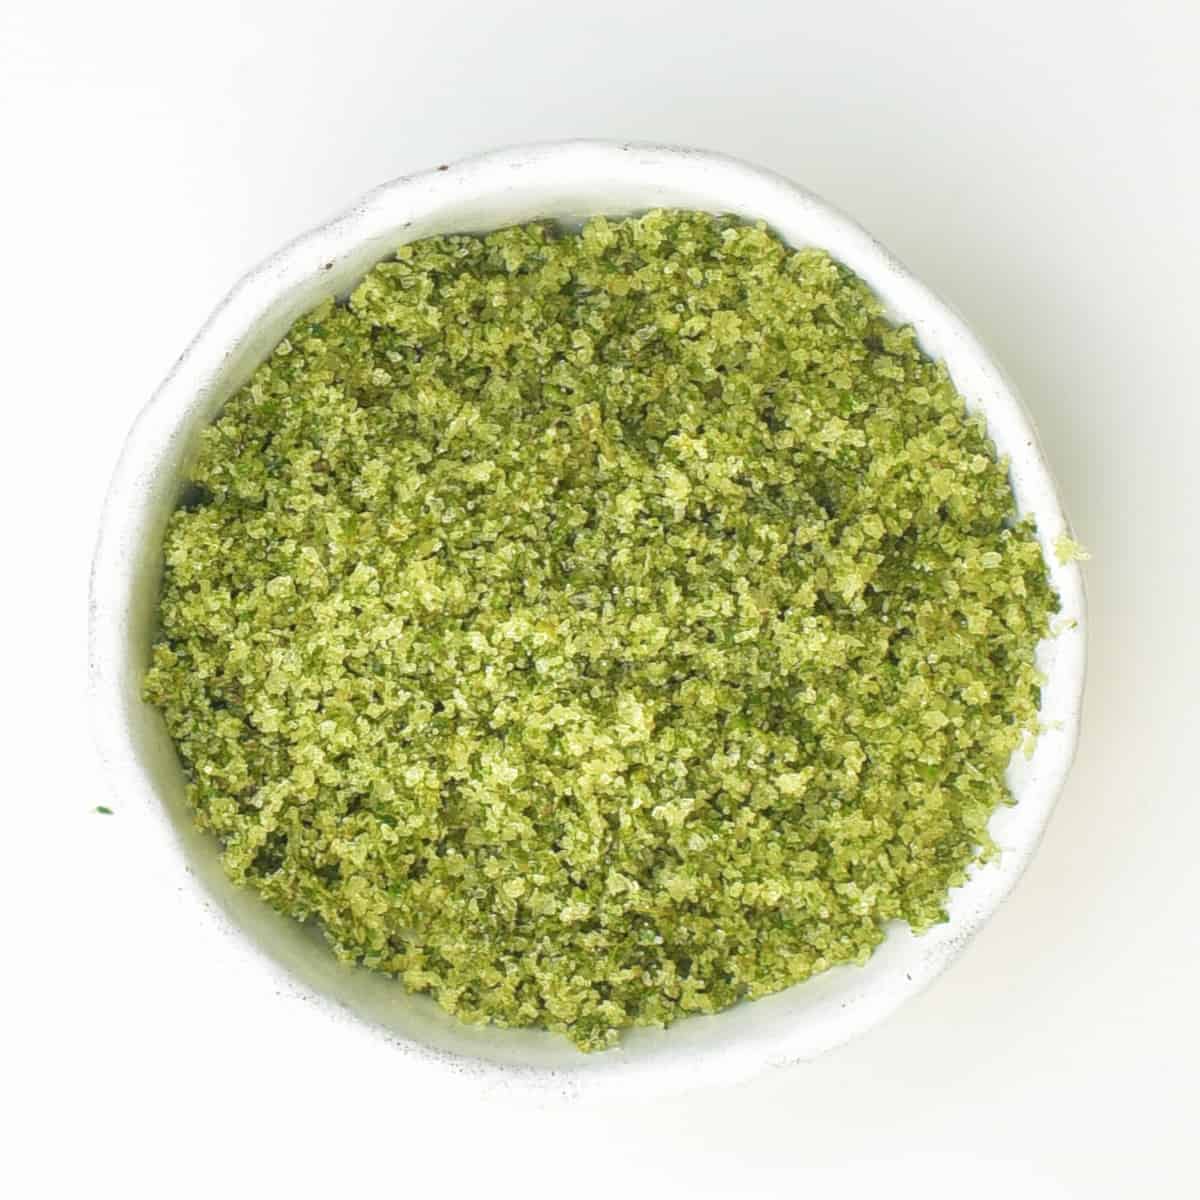
- Option A: For a Fine, Refined Salt: Place your prepared herbs, salt, and any other solid additions (like dried garlic or chili flakes) directly into your chosen appliance. Blend until the mixture resembles a fine, uniform green salt. The herbs will be fully integrated.
- Option B: For a Coarser, More Textured Salt: If you prefer a more rustic, coarse salt with visible herb flecks and larger salt crystals, blend the herbs first. Process them until they reach your desired level of fineness (from finely minced to slightly chunky). Then, add the salt and pulse just a couple of times. This technique combines the ingredients without pulverizing the salt, preserving its texture.
Once blended, if you're using fresh herbs and storing short-term, decant it into an airtight glass jar and refrigerate. If you plan for longer storage, proceed to step 4.
4. Drying for Longevity (Essential for Fresh Herbs)
This step is critical for herb salts made with fresh ingredients, ensuring no moisture remains to foster bacterial growth or mold. If you used dried herbs, you can skip this and move directly to storage.
- Oven Drying Method: Preheat your oven to its lowest possible temperature, typically around 150-200°F (65-90°C). Spread the herb salt mixture thinly and evenly over a baking sheet lined with parchment paper. Place it in the oven for 1-2 hours, or until completely dry and crumbly. Stir the mixture every 30 minutes to ensure even drying. Turn off the oven and let it cool completely in the oven with the door ajar.
- Air-Drying Method: Spread the herb salt mixture thinly on a baking sheet lined with parchment paper or a clean kitchen towel. Place it in a dry, well-ventilated area away from direct sunlight. Stir and turn the mixture daily. This method takes longer, usually 2-5 days, depending on humidity levels, but it's energy-efficient.
The salt is fully dry when it's crisp to the touch and shows no signs of moisture or clumping. It should feel and look like dry salt, not damp sand.
5. Storage and Gifting
Once your herb salt is completely dry (if applicable), transfer it to clean, airtight glass jars. Store in a cool, dark pantry away from direct light and heat.
- Shelf Life: Refrigerated fresh herb salt lasts 2-4 weeks. Dried herb salt (made from fresh or dried herbs) can last 6-12 months, though the flavors may subtly diminish over time.
- Gifting: Embellish your jars with custom labels, ribbons, or a small tag detailing potential uses. A jar of homemade herb salt makes a beautiful and thoughtful present for any occasion.
Ready to elevate your culinary creations and preserve the essence of fresh herbs? Dive deeper into the simple yet rewarding process with our article, DIY Herb Salt: Flavor Your Meals & Preserve Herbs Easily.
Beyond the Basics: Creative Flavor Combinations
Once you master the fundamentals of how to make herb salt, the culinary possibilities are truly endless. Don't be afraid to experiment with different herbs, spices, and zest to create unique blends tailored to specific dishes or palates.- Mediterranean Bliss: Combine rosemary, oregano, thyme, and a hint of dried garlic. Perfect for roasted lamb, chicken, or vegetables.
- Spicy Southwest: Mix dried cilantro, cumin, smoked paprika, and a touch of chili powder or dried jalapeño flakes. Fantastic for tacos, grilled corn, or black beans.
- Zesty Citrus Herb: Blend finely grated dried lemon or orange zest with dill and a touch of black pepper. Ideal for fish, salads, or brightening up chicken.
- Umami Powerhouse: Incorporate powdered dried mushrooms (like porcini) with thyme and a little onion powder. A savory boost for stews, gravies, or roasted meats.
- Sweet & Savory Vanilla Bean: Scrape the seeds from a vanilla bean and blend with salt. This unique salt can be used to rim cocktail glasses, sprinkle over caramel desserts, or as a surprising rub for pork or duck.
Always ensure any additions are completely dry before blending and storing to maintain the shelf life of your herb salt.
